When I first started working as a certified occupational therapy assistant in the early 2000s, the idea of using a fidget for focus and attention was not very well known outside of the therapy world. When I suggested the use of fidgets to a family, it was often very difficult to find fidgets, and they had to be ordered from specialized therapy catalogs. Of course, this meant they were more expensive. Fast forward to today, and fidgets are EVERYWHERE! Ask any teacher about the fidget spinner craze of 2016-2017… or maybe you shouldn’t. Fidget spinners were often a distraction for kids and teachers across the country, leading to them being banned by many schools.
So what is a fidget and how do you use it? Well, a fidget can really be anything that you can manipulate with your hands or feet. This manipulation of the object will give your hands or feet something to do so that your brain can attend to what is happening in your environment. If you are feeling anxious and have a lot of pent up energy, using a fidget can help release some of that excess energy.
An object does not have to be labeled as a fidget for you to use it as a fidget. One of my favorite fidgets is the zipper on a coat. When it is cold in the library, I often wear a fleece jacket. I can frequently be seen pulling the zipper up and down (it’s best for me if the jacket is unzipped while doing this). I will also flip the zipper pull back and forth between my fingers. Sometimes I like to smoosh my fingertips into the hole of the zipper pull. Other common, everyday objects that can be used as a fidget include, paper clips, coins, pens, string, etc.
Fidget preference can vary tremendously by person as they can provide a variety of sensory experiences. What can be calming and helpful for one person can be alerting or annoying for another. For example, a lot of people love those rubbery toys that are kind of sticky or slimy. Personally, I don’t like them. I don’t even touch them because they actually make my stomach turn! If I have to pick one up, I will use a paper towel rather than touching it with my hands. But someone else might LOVE the way it feels and it might be very relaxing for them.
When it comes to the use of fidgets, if it is allowing you pay attention and focus on your environment, then it is being used as a tool. However, if you are not able to pay attention to what is happening around you, and you are more focused on the fidget, then it is more of a distraction, and it becomes a toy, not a tool. This can often be a very fine line. And it can vary from day to day. The other important thing to note about fidgets is if you are using one in the classroom. Your fidget might help you focus, but it could also be a huge distraction to others around you. If this is the case, it is important to be respectful of the needs of those nearby, and it’s time to find another fidget that will still give you the sensory input you need but not be a bother to your peers. This was the problem with fidget spinners. Kids loved them, but they were so interested in them that they were being used as toys, not tools.
You can even make your own fidgets at home. The best thing about making your own, is that the process of making the fidget can be calming and relaxing as well. It is also good for working on your fine motor skills. Earlier this year, as a part of our Sensory Explorers video series, Miss Marta and I demonstrated how to make two simple fidgets using beads. This month, I am going to show you how you can make two different beaded fidgets using basic craft supplies.
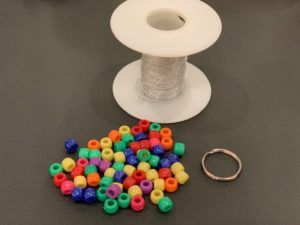
Supplies Needed:
- Keychain (any size)
- Elastic cord
- Pony beads
- Scissors
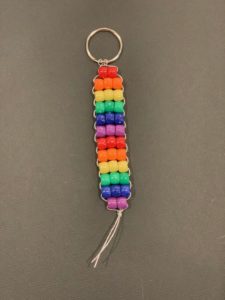
Single Row Fidget
1. Measure out approximately 2 feet of cord.
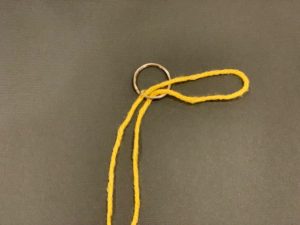
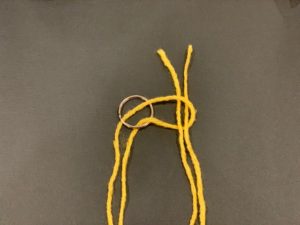
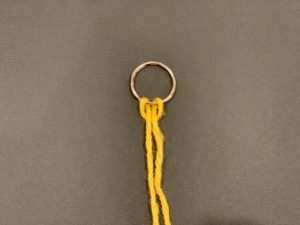
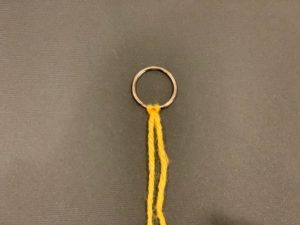
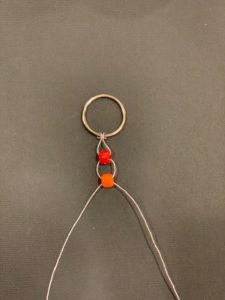
2. Attach the cord to your keychain. For the purpose of the picture, I am using yarn so you can see better what each step looks like. Fold your cord in half. Insert the folded end through the keyring. Make sure the ends of the cord are even. Then pull the ends through the folded loop. Pull tight to make a knot.
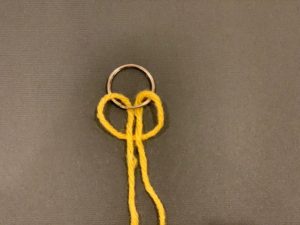
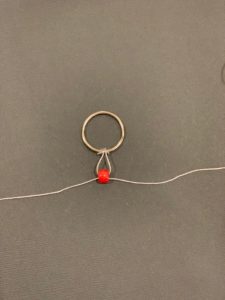
3. Determine what order you will place your beads. With the keychain on the table in front of you and the cord ends pointing towards you, separate the two pieces of cord. Guide one cord through the bead. Take the other cord and guide it through the bead from the opposite side. Pull both cords so the bead moves towards the key ring.
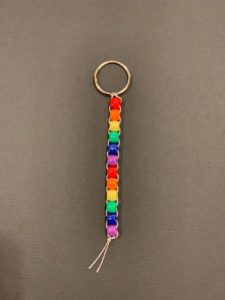
4. Separate the cords again, and repeat step three for the rest of the beads until you are happy with the length. As you add each bead, pull the cords so the beads are close together. It might take a few beads before they will stay against the key ring.
5. Once you are happy with the length, hold both cords together and tie a knot as close as you can to the last bead.
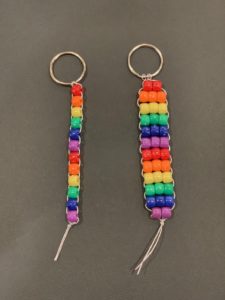
Wider Fidget
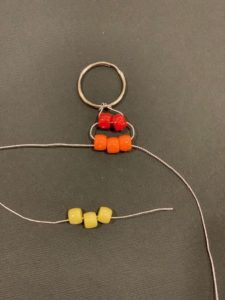
The process for this fidget is very similar to the process above. I found that the beads sit best if you use two beads for the first and last row, and three beads for the rest.
1. Measure out approximately 3-4 feet of cord.
2. Attach the cord to your keychain. See instructions and pictures above.
3. Determine what order you will place your beads. With the keychain on the table in front of you and the cord ends pointing towards you, separate the two pieces of cord. Guide one cord all the way through two beads. Take the other cord and guide it through both beads from the opposite side. Pull both cords so the bead moves towards the key ring.
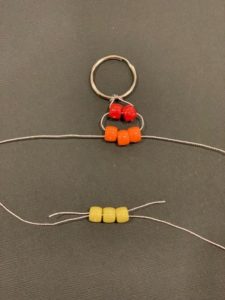
4. Separate the cords again, and repeat step three, guiding each cord through three beads at a time. Continue with the rest of the beads until you are happy with the length. As you add each bead, pull the cords so the beads are close together. It might take a few beads before they will stay against the key ring.
5. For your last row, use two beads. Hold both cords together and tie a knot as close as you can to the last bead.
Now that you are done, it’s time to fidget. There is not a single way to use these. As you play around with it, you will figure out what works for you.
What senses are active with this craft?
- Sight: Look at the colors you used. Did you make a pattern? Even if you didn’t plan out a pattern, look carefully and see if you can make a pattern as you look at it.
- Touch: This is the main sense for this activity. Try rolling it between your fingers. Now try rolling it between your palms or on the back of your hand. How does it feel rolled on your arms or legs? What about your cheeks? If you’re really brave, you can even try it on your feet and see if you like that!
- Sound: Do your beads make any noise as you fidget?
Reading Recommendations:
If you liked this craft, maybe you would like to experiment with other bead work. Check out the following books!
Bead Crafts by Greta Speechley
This book features 12 designs that show readers how to create fun bead-bearing items including jewelry, games and covers for books and bottles. Students craft their own beads from widely available and easy-to-use materials.
Cool Beaded Jewelry by Pam Scheunemann
This book provides an overview of materials and techniques used to make beaded jewelry, including bracelets, necklaces and rings.
Buttons and Beads by Daniel Nunn
This books looks at what happens to old buttons and beads when you throw them in the trash, and then it looks at alternative things that the reader could make out of them instead of throwing the buttons and beads away.